Sunday, 27 October 2019

Bringing the Chaos Monkey to heel

Introduction


Systems, microservices, services and applications can go wrong. Error messages in the middle of the night, important messages getting stuck on the system, memory and disk space overload, network glitches and any other number of unknown conditions that might befall these systems. 

To gain confidence in these systems being able to continue working - despite issues - is a focal consideration in any architecture. The ability for a system to be able to service consumers despite issues in one or several locations is known as its availability whilst the ability to restore working order after issues is the systems resilience. Through availability and resilience, a system can be created that is capable of dealing with any issues that befalls it.

Confidence is gained by performing stringent tests on a systems hardware, software and connectivity points. Sometimes these tests are spread across multiple environments with specific purposes i.e. integration test or user test. In other methods, testing is performed on a live system itself to gain the confidence that in these adverse scenarios the system can handle or recover itself.

Controlled destruction of parts of a live system – to prove its availability and resilience - is known as chaos engineering which has manifested in the container world through the Netflix model of the Chaos Monkey.

In this article we will look at what Chaos Monkey is, how it benefits systems, when it is appropriate to use chaos monkey, considerations when using chaos monkey and considerations for gaining confidence in systems generally.

What is Chaos Monkey?


In 2010, Netflix published an article referring to transition to the Cloud. One of the lessons learned was to fail constantly in a controlled manner in order to ensure that the system would continue working in the event of a failure. Thus, was born the application ‘Chaos Monkey’ whose job was to randomly kill instances and services.

A further article in 2011 described Chaos Monkey in greater detail. An actively chaotic application would randomly disable, kill and remove instances to prove the system could handle the failure and gracefully bring itself to a healthy status.  

The chaos was controlled by ensuring it only happened during the working day, with a team of specialists available to handle any fallout and delivery any fixes that might be required. This raises an understanding of how the system behaves in events that are not ‘expected’ and builds a wealth of knowledge by the teams handling the various systems of both cause and effect.

The article went on to describe a whole “Simian Army” of chaos which would independently test: 
·      Latency
·      Cross Regional Dependencies 
·      Clean-up of old systems
·      Best Practices Conformance
·      Health Checks

Chaotic State


What is not addressed in either of the articles is the ability to handle State. State being messages and configuration that need to be retained. State is important for a number of different reasons, these might be security, assurance of service delivery or even regulatory i.e. an audit.

There are three main types of State;
·      Long Term State - State that is held for a long period of time, usually in a database but occasionally in long term memory.
·      Persisted Transient State - tracking and recording a process through each of its parts so that it can be resolved in the event of a failure i.e. if a payment fails before completion
·      Non-Persisted Transient State – data that is required, but is not needed to be tracked i.e. stock check

The state might be a message, the configuration of an application or the configuration of a deployment management system itself. Chaos Monkey doesn’t mention how to handle these concerns, how the chaos is mitigated or the restriction you may need to place on the ‘chaos’. 

Consider in a container management system such as Kubernetes – how would you handle the deletion of a Helm chart from the system, would the helm chart be checked and pulled from another system? What about the reference and connection to the repository that holds all the state of the system?

Consider a system that handles a payment agreement between two systems – a salespoint and a bank. If the transaction is accepted by the bank just before the chaos monkey application kills the process, the sales point will not have confirmation of the payment and thus the customer making a purchase on the sales point will be charged but will not get their goods. 

This speaks more about managing state in cloud and container-based systems but also means that the chaos monkey application needs to be aware of state too and considered during the application design.

Chaos in Production


Chaos Monkey works well in systems like Netflix primarily because the loss of service during the working day to a live system is manageable from both a support and customer relations point of view. If, as a user, it isn’t possible to stream a video for a period of time the consumer might be annoyed by the inconvenience but little more. 

In a system where a vital service is being provided, the loss of service even for seconds may have adverse effects. Defence Agencies, Health Care, Bank Processing, Aviation and other high-risk systems it would be difficult to justify the risk of a system being down, even for testing. 

In high-risk systems the loss of service can have real life-changing effects to consumers. If, for example, a train line system was to drop a red-light signal the result could be injury or even death. To intentionally break the live system through a form of testing seems irresponsible when the costs of these systems failing are so high. 

To alleviate this risk, some of these systems will perform testing and upgrading in disaster recovery systems which resemble exactly the system in Production. This is not always possible though, as some systems require the disaster recovery system to be aware and available of production at all times which can lead to contention of which of the two is the active production system.

In the previous section, the discussion of state raised the issue around a transaction being killed mid process. In test environments this would only have an effect on test accounts that are being used, but in a live production system, real customers will face the effects of state failure.

A final thought is that the purposeful destruction of something that is live and working seems against what many infrastructure and solution teams try to build - resilient systems that are architected to run and survive. In the Netflix article the analogy of getting a flat tyre is used, the chaos monkey being that you give yourself a flat tyre on the driveway on a Sunday morning. If chaos monkey was truly chaotic, the analogy would really involve blowing the tyre out whilst driving along the motorway.

This seems dangerously unsafe for any system, indeed puncturing a tyre on the driveway is a significantly less random form of chaos. It is more like a test environment in any case and is a very drastic action to take. In the flat tyre analogy, the driver could get the same confidence by testing each of the component parts independently – inflating the tyre, changing the tyre, ensuring you have the correct tools etc. 

In all readings, chaos monkey comes across more as controlled production testing. Even without chaos monkey, systems should complete disaster recovery once a year to perform the most drastic of tests. As such, chaos monkey is not truly chaos and since it is testing should be treated as such.

Adequate Planning & Testing


If chaos monkey can be dealt with as testing, there are some reasons why it will not be described as ‘chaos’. The application performing the killing of services and instances can only do what it has been programmed to do and as such its remit is known and could be planned for without the actual destruction.

Whilst unknown consequences may occur from chaos monkey this can - and in most cases should – be performed early in the test cycle in lower environments. This also raises the importance of having a production like environment before production which is a replica in every way.

Since chaos monkey is testing, there are the typical positive and negative considerations that comes with it. The cost, value and risk. Testing on the scale of chaos monkey requires willing to perform testing in production by those who own and support it, the budget to spend time finding issues over completing new functionality.

Real Chaos


In the real world, chaos is just reality in play. There is no way to plan for the unthinkable, unplannable and unconsidered. Problems will always occur and by its nature chaos is chaotic. Unmanageable, unplannable, uncontrollable – in a way that cannot ever be represented through test.

If chaos cannot be controlled, then it should be instead be prepared for. Chaos monkey allows for this preparation by testing the fall backs systems have in place. There are several thought processes that can be put in place;
·      High Availability – what happens if each component part breaks? Can it fail over? Can I resume service quickly and easily?
·      Disaster Recover – what happens if an entire active system fails? Can it fail over? How long does it take to return to service and how much time should be set aside to get the system back to its full availability? (Recovery Time Objective and Recovery Point Objective)
·      State – how is state handled in the event of each failure? Is the system able to recover a transaction mid process? 
·      Risk – what risk is acceptable? How is each risk mitigated?
·      Testing – Is there a safe place to test all eventualities outside of Production? Can Production be replicated sincerely?

Conclusion


Whilst chaos monkey is not chaotic it has great worth as a testing facility. It can be used to gain confidence in a system, understand the consequences of actions and mitigate risk. Chaos monkey activities are relatively controlled and managed and as such constitutes an advanced cloud-based testing strategy.


In contrast to the teachings of chaos monkey, testing might not always be possible – or safe – to perform in Production but should be instead performed in a test environment. At least one of these test environments should look exactly like production in every way, where each component of each fail-safe strategy is tested.

Tuesday, 27 August 2019

Beard Trimmer Salvaging

For my 18th Birthday (almost 9 years ago!) I got a Phillips QT4013/23 Series 3000 Beard Trimmer from my Auntie and Uncle, it has served me effortlessly since. I probably had no beard to trim until I was 20 which means it has worked hard these last seven years.

Recently the head snapped and unfortunately there were no replacements heads which meant it was to be consigned to the scrap heap. Instead, I thought I would see what I can salvage from within.

On a side note - its very very frustrating that you cannot just buy parts and end up buying something completely new - incredibly wasteful.

Disassembled
The razor head itself came off quite easily but as you can see from the top all it would be good for now is a hair comb. The razor blade clicks out, which evidently means that *it* can be replaced - it's made up of a spring and two white prongs which are moved from left to right by the rest of the razor.

The rest of the workings were trapped inside the three plastic cases on the left. The dial in the centre of the far left plastic pieces, pushes a motor higher or lower. The motor causes the prongs on the razor  to move from left and right causing the cutting motion.

The motor is powered by two batteries on a motherboard with a switch at the back which can be turned on or off by the right most plastic cover. The additional benefit of the battery setup is that it can be recharged by applying the charger to the bottom which will be useful in future projects - as I can make a solar charger charge it up.

Not a lot that can be saved here except the battery, metal pins and the motor. The rest will be consigned to the scrap head :'(

Sunday, 11 August 2019

Football Simulation Engine v3

2 Years ago I published my first node package module (npm) in npmjs to allow football match results to be simulated. Yesterday I uploaded the latest version FootballSimulationEngine-v3.0.1 which can be installed by running:
          npm install footballsimulationengine

What's New?

startPOS and relativePOS have changed

The biggest - and breaking - change was to update the arrays used to track where players currently are on the pitch (startPOS) and where players are moving towards (relativePOS). These were not very descriptive and resulted in several GitHub issues so they have been changed to better reflect what they do. "startPOS" is now "currentPOS", "relativePOS" is now "intentPOS".

"currentPOS": [340,0],
"fitness": 100,
"injured": false,
"originPOS": [340,0],
"intentPOS": [340,0],

Tests tests tests

I have been reading more and more about the importance of tests and clean code, in fact its been prominent on this blog:
As described, I have added lots and lots of tests into the code making it more readable, easier to make code changes, has led to variables and functions being named more accurately. The result is 143 passing (199ms) tests and roughly 55% test coverage.
55.88% Statements 1401/2507
44.32% Branches 655/1478
82.13% Functions 170/207
53.14% Lines 1227/2309


Penalty Position - Corner and Freekicks

Players no longer form an arbitary collection of bodies at a set location for freekicks and corners, instead they now gather in the penalty box which is a defined dimension on the pitch. This makes corner taking more realistic and improves goal opportunities from corners.

Identifiers

Previously, the current ball holder and the team they were playing were matched against their names for certain logic. i.e. can the player kick the ball? First, we need to know if that player has the ball. Now each match, player and team are given an identification number during initiation. 

{
"matchID": "78883930303030001",
"kickOffTeam": {
"teamID": "78883930303030002",
"name": "ThisTeam",
"rating": 88,
"players": [
{
"playerID": "78883930303030100",
 

Red Cards

Players who get red cards will no longer be part of the playing action. This is shown by current position being set to ['NP', 'NP'] which means 'Not Playing'. If the current position is set the player will not be targeted for passing and will not make any movements.

Skill Rating Utilization

Player skills are better utilised including to make shots on or off target depending on their skill against a random number generation i.e. players with shooting skill of 40 will be less likely to shoot on target than players with shooting skill of 70. This is also applied for saving shots that are in the box with the skills of the goalkeeper determining if the ball is 'saved' or not when in reach. 

Future iterations will take this further for more sophistication. If you have any thoughts for how to do this be sure to raise an issue in GitHub.

Player Stats Improvements

Player statistics from during the game have been greatly improved with statistics for fouls, passes, shots and tackles. This will improve reporting of player information. 

If there are others that can/should be added, raise an issue in GitHub.
'goals': 0,
'shots': {
'total': 0,
'on': 0,
'off': 0
},
'cards': {
'yellow': 0,
'red': 0
},
'passes': {
'total': 0,
'on': 0,
'off': 0
},
'tackles': {
'total': 0,
'on': 0,
'off': 0,
'fouls': 0
}

Conclusion

There are still some improvements to be made, to player movement (which still isn't quite there), passing statistics, intelligence of decisions being made and whole lotta tests to be added. I'll be blogging soon about how I've used this latest version to simulate the 2019/2020 season to showcase how the engine can be used to simulate a season for a football manager game.

Let me know what you think, either in the comments, or by raising an issue on Github or emailing me on aiden.g@live.co.uk! Happy footballing!

Saturday, 20 July 2019

Connecting to db2 with JDBC Driver in App Connect Enterprise (ACE)

Whilst recently connecting to an IBM DB2 through an App Connect Enterprise (ACE) bar file following (parts of) this tutorial on developer works - https://developer.ibm.com/integration/blog/2019/01/15/connecting-integrations-to-jdbc-endpoints-on-app-connect/ I hit a couple of issues due to using different naming standards and from (naughtily) plucking specific parts from the article but not following it properly. 

I have been using IBM Cloud Private where both an ACE helm chart (11.0.0.4) and DB2 are both deployed with different names and data models than those defined in the example. If, like me, you bypassed parts of the example here are some issues you might have seen.

1. In containerised ACE deployment the JDBC Driver JAR should be loaded into the project to be packaged with the bar (as decribed in the article above)

a.    In the ACE Toolkit go to Window -> Show View-> Java
b.    Drag and drop the db2jcc4 JAR file into Project window
c.    Right Click (double finger click on the MAC) on the Java Project Folder and select Properties -> Java Build Path -> Click Add JARs -> Select db2jcc4 jar file -> Click OK
d.    Ensure the Java Project is included in the bar file
e.    Ensure “User JAR files that have been deployed in a .bar file” is set to true in the JDBC Policy as defined in the tutorial and that the policy is included in the bar file build

2. After the deployment there was still an error that persisted;
"com.ibm.broker.classloading.JarsURLClassLoader.findClass(JarsURLClassLoader.java:104)" 
I was able to find greater debug logs in ICP in the following file, in the following file;
/home/aceuser/ace-server/log/integration_server.<servername>.events.txt
6231E: An error occurred in node: Broker 'integration_server'; 
Node Type 'DeleteProducts_JavaCompute Exception details:  message: com.ibm.db2.jcc.DB2XADataSource stack trace:  java.net.URLClassLoader.findClass(URLClassLoader.java:610) \ncom.ibm.broker.classloading.JavaResourceClassLoader.findClass(JavaResourceClassLoader.java:180) \ncom.ibm.broker.classloading.SharedClassLoader.findClass(SharedClassLoader.java:209) \njava.lang.ClassLoader.loadClassHelper(ClassLoader.java:937
 The error looks like the jar has not been correctly loaded, to check we can;

  • Looking in the bar file on the toolkit in the ‘Manage’ tab which should show the jar file in the REST API Application.
  • Convert the bar file into a zip and unzip it to see the files inside where the jar should be visible.
If that all looks good, next you should check the JDBC connection in the Java Compute Node.
Connection conn= getJDBCType4Connection("BLUDB",                                      JDBC_TransactionType.MB_TRANSACTION_AUTO);
The example makes it look like BLUDB should match the name of the policy since the policy, database name and connection definition are all the same. The error also doesn’t point very well at what the issue is.

The connection should refer to the Database name being connected to. In my personal view, I would follow the example and call the policy the same name as the database being connected to which can be referred to in getJDBCType4Connection.


Hopefully this has helped you with your development! 

Thursday, 30 May 2019

Practising Clean Code in Node.JS

Having recently read Robert C. Martin’s book - “Clean Code: A Handbook of Agile Software Craftsmanship”. I began to look again at some of the code I have written before, specifically in Football Simulation Engine (FSE).

The book explores what makes code ‘clean’ and details why code writers should and would want to follow some core principles that makes reading, understanding and working with their code as simple as possible.

With a view of applying key principles learnt in my own code, this post will look at the thought process as we go through the code until it feels or ‘smells’ clean.

9 Key Clean Code Principles

From my own reading I took key principles of writing and reviewing code;

  • Readability is key
    • Code should fit on the screen
    • Small functions improve readability
    • Code should read like a newspaper; top to bottom, left to right
    • Remove ambiguity
    • Stick to personal or team convention
    • Question: Can you read your code without pausing?
  • Leave code cleaner than you found it
    • Remove unused variables
    • Remove duplication
    • Add test cases where needed
    • Build ‘factories’ / ‘common’ functions
    • Check readability
  • Single Purpose Functions
    • 0<>150 characters width, 0<>20 lines long
    • Single Responsibility Principle
    • Arguments: 0 Best, 1 Great, 2 OK, 3 Bad, 3< STOP!
    • No Flag Arguments
    • No Output arguments
    • Functions should be close together for readability
    • Write third party interface as a function
    • Don’t pass or return NULL
  • Name things for their purpose
    • Be consistent
    • Agree Conventions as a team
    • Names should make the purpose obvious
    • Reduce Ambiguity - ‘addedNumbers’ could be ‘velocityPlusDistance’
    • Should include side effects
    • You can refactor another person’s naming
    • No Encoding of names
  • Refine, refactor and be comfortable with review
    • Code reviews are normal and non-personal
    • Be comfortable receiving and giving code reviews
    • Read the code. Any pauses?
    • Read the code. Any ambiguity?
    • Check for Duplication
    • Complete when tests 100% pass
  • Test are as important as your code
    • Follow Test Driven Development
    • Should be testable with ‘One Step’
    • One concept per test
    • Don’t skip trivial tests
    • Test extra where bugs are found
    • Big tests will never get run
    • ‘Learning tests’ on third party code are free tests
    • Tests should have readability at heart
  • Comments are a necessary evil
    • Delete inappropriate, redundant, poorly written, obsolete or old comments
    • “To Do” comments are OK if they add value and are time boxed
    • If writing a comment, ask why?
    • Never comment out code
  • Reduce/Remove duplication
    • Build common libraries
    • Look for patterns in code
    • Not all duplication can be removed, that’s OK
  • Code should ‘smell’ clean
    • If you have to reread a line of code
    • Structure comes before convention
    • Are there enough tests
    • Planned return to complete work - why not do it now?

Applying Clean Code to an existing Project

For this blog we will be looking at the FSE v2.2.0 - setPositions.js file. To do this we first must ask ourselves some key questions:
  1. Are my changes isolated and can they be rolled back?
  2. Do I have enough tests?
  3. What is the test coverage?

Are my changes Isolated? Yes. I have created a new git branch and can roll back the changes if needed.

Do I have enough tests? Applying Clean Code is going to mean a lot of refactoring, changing naming conventions, reducing functions, separating out concerns etc. Tests are key. I currently have limited tests for this code thus I will have to write some.

What is the Test Coverage - To understand how much of the code I am running with existing tests I have installed a module called nyc which runs mocha tests in Node.JS to output into text or html the number of lines, branches, functions and statements being covered.

Writing Tests:

With the initial code coverage at just 8% - because the functions in this file are called by functions higher in the code - I begin to start writing some tests. The plan is to take each function, review its worth, check existing naming conventions and see if the function complies with the Single Purpose Function principle. There will then be tests written in expectation of what the code should do rather than its current implementation.

To write the tests I will be following Test Driven Development (TDD) as recommended in the book by following my previous post method for implementing TDD tests into an existing Node.JS project.
If we look at the function - setCornerPositions we can see straight away that it does not comply with a Single Purpose Function. In context, this function sets up players in a football/soccer match at either of the four corners of the rectangular shaped pitch.

Original Set Corner Functions
This code is performing 4 key functions; putting player in specific places based on the corner locations; ‘top left’ corner, ‘top right’ corner, ‘bottom left’ corner, ‘bottom right’ corner. The code should be split up accordingly.

When you first look at the original code again for the first time in a while you get the urge to throw everything away and start again. But there’s a lot of thought gone into existing code, even if it not as clean as you like, and that core thought process is what we are retaining by cleaning instead of dumping code.

Instead we write a single test and make small changes.


First this test fails, because the function doesn’t exist yet. I create a simple function called setTopLeftCornerPositions, input matchDetails - which are always needed because this denotes state in the simulator - and output matchDetails - which represents the change in state by the function.

Initial Test Scenarios
This test passed and successfully tests the location of the attacking goalkeeper in their own half. However, this obviously doesn’t cover very much functionality, it doesn’t show where the other 21 players are indeed, doesn’t check the ball information like position, team with the ball etc. A more comprehensive test might look like something below.

Comprehensive test cases

When 1 function becomes 4:

Because we are splitting setCornerPositions into 4 distinct functions there is a need to test that the correct function is being called in the correct scenarios. To do this we write some tests that will call each of the four corners in the existing corner calling location. This function keepInBoundaries needs four new tests to that send it to the four functions being created.

The new tests pass in out of boundary positions and then check the opposition goalkeeper is in the correct position and that a log has been inserted dictating the correct set piece (corner) and that is has been assigned to the correct player.

Boundary tests
Initially only one of the four FAIL. That’s because I have only created the single function so far and that function passes back what it receives. The other three functions are created, and the existing code is copied into the function.

What can we clean:

Cleaned Corner code
All four aim to remove the ball from the existing players which it completes using two function calls; remove ball from team 1 and remove ball from team 2. This adds an extra line of code for an extra function that does the same thing. Removal ball from 1 team’s players is as single purpose as removing the ball from all players.

After positions are set for individual players there is a piece of duplication in setting ball specific details like assigning it to an attacking player, removing ball movement and ball ownership to a team or player. This is seen across all four corner functions and so can become a function to be reused. This reduces duplication.

Improved Naming:

There are additional benefits when we split the code into the four functions. The first is that we have the ability to reduce the number of parameters we pass into the function since it performs one task and one task only.
function setCornerPositions(team, opposition, side, matchDetails) {
If we know there is a corner in the top left position, we know that the team whose base position is that side of the pitch must have kicked the ball out of the pitch. We also know which will be attacking and should have possession of the ball and which team will be defending. This can all be derived from the single ‘matchDetails’ which gives a greater understanding inside the function itself as to where the data has come from without having to locate the function call elsewhere in the code.

In the old code there is a repeat reference to ‘team’ and ‘opposition’ which implies that team is the team that will have possession and opposition will be in defence. However, this is ambiguous since both teams will be the ‘team’ from their own perspective and the other the opposition. ‘Attack’ and ‘Defence’ much better which has possession of the ball.

Add Tests:

With these new tests we can see an increase in code coverage in terms of statements and lines and branches which is satisfying to see.

STATEMENTS BRANCHES FUNCTIONS LINES
setPositions.js 18.35% 129/703 11.55% 29/251 48.72% 19/39 17.26% 117/678
setPositions.js 29.16% 212/727 18.01% 47/261 42.86% 18/42 29.2% 205/702

Repeat the new method:

From here the same method could be applied to setGoalKicks which when the ball was passed over the same positions as for corners but by the team on the same side. This functionality also performed two distinct functions i.e. set a ‘top’ side goal and a ‘bottom’ side goal with a requirement for the team and opposition to be supplied even though this was implicit.

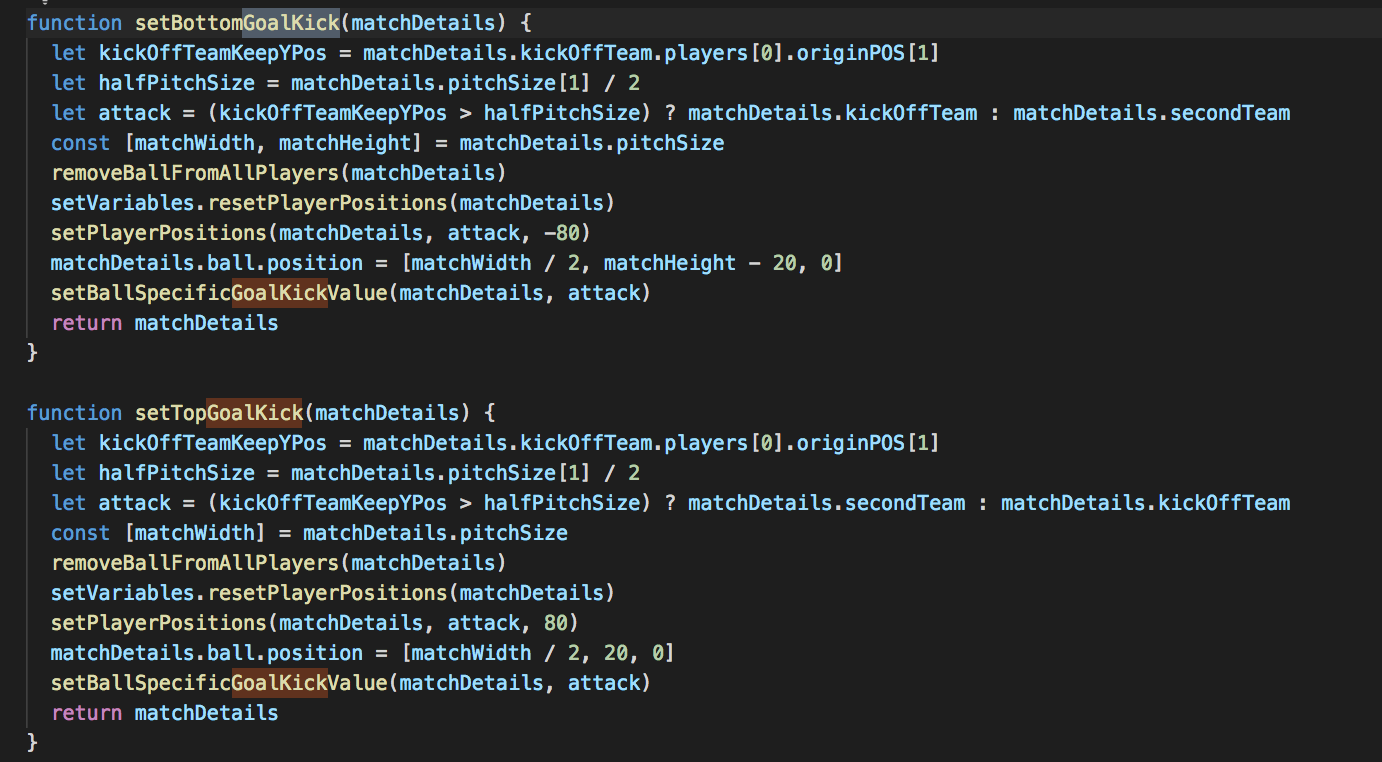
Set goal kick before
Set goal kick after cleaning
The function was split into two, the function was made smaller using best practices of the current node version (v10.10.0) and repeated code was pulled into its own function (setBallSpecificGoalKick). Whilst the first set of changes took considerable time, the second set of changes were quick to replicate with tests written before any change made.

Test writing process:

  1. Write tests that will adequately cover the functions being changed
  2. Evaluate the written tests complete the requirements successfully i.e. all players for a goal kick should be in front of the goal keeper taking the kick
  3. Make tests as explicit as possible to reduce different code outcome
  4. Make naming as clear as possible

Name of tests should be readable at a glance; from experience this is because it is hard to understand where failures are happening in the code if they are called ‘test1’…’testN’. Another benefit of clear test case name is that straight away you know what test is failing and with enough detail you can make it clear what the test state is as well.

This is also true for test variables. Just like in our normal code this should not allow for ambiguity and should be clear from a glance what it is trying to do. i.e. the test ‘describe’ name, function name, and variable names - ‘defencePlayer’, for example, means the current defending player in the loop.

Well named test example

‘Smelling’ the code:

Having successfully replicated the process for setTopGoalKick and setBottomGoalKick there is still a lot of code to cover and so the process of cleaning the code can be applied to the next fuction which sets setpieces. i.e. penalties and freekicks.

After writing tests for the expected behaviour of the -to be split - function, it is important to get a smell of the code. Which leads to a number of observations;
  1. The existing code does not calculate the setpieces correctly and it is likely that specific setpieces are given incorrectly. Ouch. We have a bug!
  2. The new tests must reflect intention and requirements over validation of the existing code.
  3. The code itself ‘smells’ like it could be cleaner
  4. By rewriting the setPiece to be split per team it is easier to understand the position of the ball, who has possession and the direction they are travelling. Splitting the functions removes ambiguity and will reduce possibility of bugs
  5. Any changes now will affect the calling of setPieces by other functions, so tests need to be written for those too
  6. The data set used to generate the scenarios of the tests take the most time to write. They need to be precise or the tests are worthless.
I will skip the exact steps for changes as they replicate directly what I have done in the other functions. The process is repeated for throwIns, penalties and minor functions.

So far, so clean:

Up to this point all the functions except one have been ‘cleaned’ following clean code principles. Test cases have increased from around 20 tests to 96 passing tests with the code coverage as follows;

Before relativePositions cleaned - a particularly important, bulky function with high significance on user experience

STATEMENTS
BRANCHES
FUNCTIONS
LINES
setPositions.js
44.98%
336/747
36.26%
99/273
72.22%
39/54
44.04%
314/713

After relativePositions cleaned:
STATEMENTS
BRANCHES
FUNCTIONS
LINES
setPositions.js
69.11%
566/819
63.61%
250/393
97.06%
66/68
66.26%
493/744

Adding Comments:

So far there have been no comments added to the code because the naming allows the flow to be read much easier than before and in the most part the functions themselves are being kept within the 20-line limit, but exceptions have been made where necessary. The rules are not strict but are common sense and best efforts to be completed. Additionally, by using a linter(link) the code can have a standard applied which keeps line less than a prescribed length.

Separating Concerns:

The final part of the cleaning of the code looked at the structure of the file system. It is immediately obvious from the table above that the remaining function is far too large to sit intertwined with all the other functions. It takes up 30% of the code base and makes the file hard to navigate and hard to read.

On this basis setFreekicks could be isolated into its own file before the same process was applied. The following table shows how code coverage improved when the file was split.

STATEMENTS
BRANCHES
FUNCTIONS
LINES
setFreekicks.js
13.95%
41/294
6.11%
8/131
60%
3/5
13.75%
40/291
setPositions.js
100%
532/532
92.37%
242/262
100%
64/64
100%
460/460
Tests - 96 passing (121ms)

STATEMENTS
BRANCHES
FUNCTIONS
LINES
setFreekicks.js
100%
383/383
95.1%
194/204
100%
39/39
100%
315/315
setPositions.js
98.89%
534/540
91.35%
243/266
100%
64/64
98.72%
462/468
Tests - 120 passing (179ms)


It can be seen in the tables above that SetPositions code coverage has been reduced as a result of the changes made to setFreekick. However, the parts of the code not covered are apparent edge cases which can be ignored for now because of time limitations. Whilst not ideal to leave code untested a progression from 13% coverage of single file now sees 100% and 99% of the same level of functionality.

Next Steps:

  • Find someone to review the code. Their ability to read the code will mark the success of the activity
  • Embed the tests into code deployment automation
  • Embed the linting of the file into code deployment automation
  • Recognise there will still be improvements to make
  • Work to achieve full test coverage of all the files

Thank you for reading through this - well done if you got all the way to the end, it was a long read!

Clean code is an important part of being able to share, reuse and understand code. Hopefully this practical application of clean code practices has shined some light on how the process might look.

Thursday, 4 April 2019

Dehumidifiers - Fix, Repurpose, Recycle

We have been using dehumidifiers for a while now, mainly to help keep the moisture from the shower off the walls. However, they appear to be prone to breaking and so this blog post is intended to show how you might fix them when they break, why they might break but also I intend to expand it as and when (inevitably) they do break.

                       'Fun' Fact - Relative humidity in the home shouldn't exceed 40 - 50%

What are dehumidifiers and how to clean them...

This section should be nice and simple. Clean your dehumidifier once every month making sure to get the dust and fluff from between the vents. 

A company called air&water do a lot of great dehumidifier guides for;

When a dehumidifier breaks...

The loose pin - I put the water reservoir in but the light is red and the fans are off

Model: HD-68W (Challenge) 9v 3A

In most small dehumidifiers - in the UK at least - there are two small pins that hang from the inside of the device onto the water reservoir. In the picture below, the left pin when pushed upwards (by the water reservoir) turns the device on - you should see a green light on the device as it is pushed up.

The second pin - on the right - is designed to rest on a float within the reservoir. When the reservoir is empty the second pin is dropped but as it fills, the float slowly lifts with the water causing the second pin to rise. When both the pins are raised you will see a red light and the fans will be off.
Reservoir
This might be because of a loose second pin, meaning it does not rest on the float when you insert the reservoir but instead is pushed up by the solid frame making it perpetually 'off'.

Solution: Wiggle the second pin back into its rightful place - I pushed mine back and it is still working several months later. Alternatively you can replace the part (coming soon)

two pins

The blown switch - I try to turn on the switch but it flicks straight back to off

Model: HD-68W (Challenge) 9v 3A


When another dehumidifier we have seemed to stop turning on I started to look inside to see what was causing the issue. In the first picture we can see that the switch is connected by two wires, which, when removed shows the lower one to have burnt out. This was connected to the plug insert where the power is passed through into the device.

2.5amp 2 Core plug insert
The switch connects to the motherboard which provides power to the light and the fan used to draw in water. This connects to the 2 Core plug insert that provides power and thus completed the circuit.
Circuit Diagram
I wasn't sure if the plug insert or the switch had broken so was able to find the following part that could be used to replace the piece. However, it's incredibly hard to find a matching switch, the closest I could find was on RS-Components which might need some modification to be usable.

Recycle and Reuse

I find myself increasingly frustrated with how hard it is to find parts to fix products or the sheer cost of fixing with the matching parts against buying a new device. For £30 per mini-dehumidifier it seems hardly worth the time to fix, especially when buying new (not-matching) parts would need modification to the frame to make the parts fit.

However, rather than throwing away old devices, there are lots of parts you can keep for reuse;
  • Screws can be used elsewhere and are always handy in the toolbox.
  • Metal can be cut off and used as frames or connectors on other projects. Each strip can be cut into individual sheets or can be independently recycled in a metal recycling bin.
  • The fan is a good part to keep as a spare part in case another dehumidifier breaks (or as I'm currently thinking, to make a fan powered boat)

  • Plastic shell can be recycled in a plastic recycling bin although make sure all the electrical parts have been removes
  • Plug insert can be kept for replacement in the future or for use in another project.
  • Wires can be cut out and reused elsewhere for other electrical projects

Other dehumidifier fixes?

If you would like to add to this with your own fixes send me an email and I can add it in for others to use.