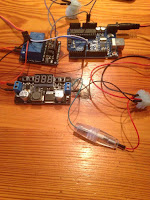
So it's finally been made.
In preparation for our trip to Italy, Louise's housemate Alastair and I have made an Arduino Powered Watering System.
The idea we formulated was to have a large water butt which lets water flow into a secondary container at set times. Once in the morning and once at night outside of the intense sun hours.
This secondary container will have water taps that are always on so water flows through. This was designed so we only have to power one servo to let all the water supply needed out in one go.
The list of things we needed and our estimate prices were;
----
rechargeable 12v battery lead acid - £8 - £20
Solar Charge Controller Panel Battery Regulator Safe 10A 12V/24V - £5 - £10
Tower Pro SG-90 SG90 9g Micro Servos £2 -£4
Arduino Uno R3 - £5
25L - 45L tub - £7 - £25
long plant plot with flat sides - £3 - £10
air tight water taps - £3 - £4 each most retailers (5)
hose pipe - £5
Solar panel charger 10W 12V £15 - £40
2 Channel 5V High Level Trigger Relay Module - £1.50 - £5
Car wire Fuse - 15p
Dc Dc Step Down Converter Voltage Regulator 24v 12v To 5v Usb Charger Voltmeter - £1 - £3
------------------------------------------
In the end the total cost was: £80 (including broken parts) + £10 for a wooden frame
------------------------------------------
First we created a wooden stand to hold the 35L tub we had, hastily constructing it on the allotment using tools from the shed we'd inherited with the plot. We made sure there was just enough room for the secondary containers shelf so that the water was as high as possible. The higher the secondary container the easier water would flow into the pots using gravity alone.
 |
| The stand with two shelves
We then fitted the solar panel, a 12v 10w device that we connected to the roof of the greenhouse using bolts and a bit of wood. Making sure the solar panel faced south so as to get sun from morning to night. The solar panel hooked to the solar regulator which we attached to the left front stand so we could easily see the battery levels.
The regulator has three connection points; + and - for the solar panel, + and - for the battery and + and - for the thing being powered. In our case the Arduino.
********************
Lesson 1: Just because an Arduino can take 12v input... it does't mean it should.
********************hint - smoke and fire
The servo - chosen after the terrible instrument called the solenoid, read more HERE - was attached to a water butt tap which it turns 75 degrees to an open position for x amount of seconds before closing. It then repeats the process having left enough time for some of the water to have got into the soil.
********************
Lesson 2: If you can't find the right resistor, do NOT connect a 12v power source to a 5v servo
********************
To make sure the servo isn't always on and therefore draining battery. The servo needed to have power to it stopped when not needed. To make this happen, the arduino was connected to the relays IN1 so that control of whether to power the servo could be decided by us. We then wired the servo to the IN1 relay output so it could be powered in these time.
Now. Lesson 1 taught us what havoc charging 12v to 5v device could cause, so we decided to obtain a 12v to 5v step down convertor, this would allow us to regulate the incoming power to the arduino and the servo whilst also reducing power usage.
********************
Lesson 3: Powering a step down convertor in reverse - 5v in the 12v ports and vice versa - results in ringing ears
********************
The next thing we added, to reduce the possibility of blowing everything up too often was the fuse, which meant the fuse would take the fall. Its actually had some value and we've only blown one up so far!
In all these fires and explosions, the only thing we haven't destroyed yet is the 12v car battery which has thus far served us well. This also connects to the solar regulator - a very simple device that controls how much energy the Arduino receives, how much the battery takes and when to fill up the battery.
The final pieces to discuss is the secondary tub. This is only suppose to fill up with just enough water to release into the taps connected to its sides. It does't need to be large as it should be dispensing water at the same rate it is receiving it. If it isn't then you are releasing too much water, either from the primary store or the taps aren't open enough.
**********************************
Below is a picture of the system drawn out:
**********************************
In Action:
If you would like to see the arduino source code, feel free to email me on aiden.g@live.co.uk
|


No comments:
Post a Comment